Users
The Users tab manages direct package assignments independently of group membership. Use it to assign one person, import a list, start a new training attempt for someone previously assigned, or review each user's latest course statuses.
When to use direct assignment
Use this tab for:
- Users who aren't part of any group.
- One-off assignments where only specific people need this package.
- Re-assigning users who need a new attempt for recurring training.
Use the Groups tab for bulk rollouts — everyone in the group is covered and new members are included automatically. Use Users for exceptions or individual follow-ups.
Assign one user
- Open the package and select Users.
- Click Assign One User.
- Enter the user's first name, last name, and email address.
- Complete any package assignment custom fields shown in the window.
- Click Assign.
If the email address belongs to an existing user, the package is assigned to that account. If they previously had this package — including under a different group — assigning it again starts a new attempt on its courses, unless Recognize Prior Training is turned on for the package, in which case their existing progress is kept instead.
Assign users with a CSV
Use Assign With CSV to assign or re-assign up to 500 people at once. Each person who previously had the package starts a new attempt, even if they completed its courses before — unless Recognize Prior Training is on, which keeps their existing progress instead.
Prepare a .csv file with a header row and these columns:
| Column | Required | Notes |
|---|---|---|
| First Name | Yes | The learner's first name. |
| Last Name | Yes | The learner's last name. |
| Email Address | Yes | Must contain a valid email address. |
| Required package custom fields | When configured | Use the custom field name as the column heading. |
| Do Not Email | No | Controls whether the assignment email is sent. |
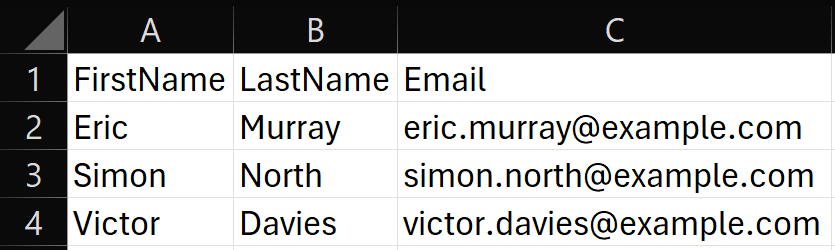
Your columns can be in any order. The system maps standard headings automatically or asks you to select the first name, last name, and email columns.
To assign the file:
- Click Assign With CSV and select the file.
- Map the required columns if prompted.
- Review the imported rows, then click Import.
- Check the result of each row. Use Show failed only to focus on errors.
- If any rows fail, click Download Failed CSV, correct the listed errors, and import those rows again.
Use the help icon beside Assign With CSV to view the expected format and download a sample file.
Manage assigned users
The table lists each assigned user's email address, name, group, invitation status, and most recent assignment date. When you open the package from a specific group, the Group column is hidden because every user shown belongs to that group.
Use the actions on a row to:
- Resend Email — send the assignment email again.
- Re-Assign — start a new attempt for recurring or repeat training. This always starts fresh, even when Recognize Prior Training is on for the package.
- Courses — expand or collapse the user's course-status details.
- Archive User — remove this package assignment from active views. See Archive Users for individual, bulk, and CSV options.
View course statuses
Click Courses on a user's row to display one row for each course in the package. The expanded details show:
- Course — the course name.
- Status — the latest attempt's current status, such as Not Started, Incomplete, Completed, Passed, or Failed.
- Date Completed — the completion date for Completed, Passed, and Failed attempts when a date is available.
If a user has multiple attempts for the same course, only the latest attempt is shown. Click Courses again to collapse the details.